-
Use Import a Web Archive if you want your course to
include information from other websites. You can either upload a zip file or
specify a URL to a website. You upload this file from your computer, and add it as an element to your course.
To add a web archive:
-
Click the Manage Courses tab. The Courses list is displayed.
- Click on the name of the course. The Edit Course Details window is displayed with a task list.
- Click Manage Course Elements from the task list.

- The Elements list for the course is displayed.
- Click Import a Web Archive from the Course Elements list. The Import a Web Archive window is displayed.
- Type the title of the Web Archive element and select if you are uploading a .ZIP file or an entering and external URL.
Importing a ZIP file:
- Click the Archive ZIP file button.
- Click Choose file within the File field. Your file selection window is displayed. Select the ZIP file you want to import and click the Upload button.

- The web archive you imported is displayed on the Elements list.
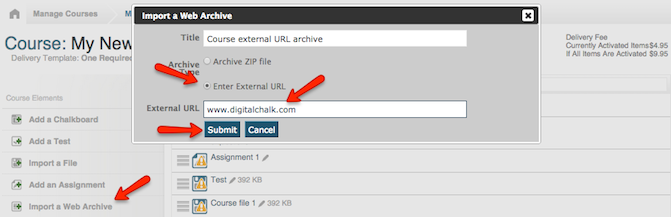
Importing an external URL:
-
Click the Enter External URL button.
- Enter the full web address for the reference location, including the http:// or https:// prefix, and click the Submit button.
- The web archive you imported is displayed on the Elements list.
Edit Web Archive Details:
Now that you've added the Web Archive element, you can specify general information about the web archive, such as where it is stored and how it is displayed.
- To specify general information about the web archive element, click on the name of the web archive from the Elements list.
- The Edit Web Archive Details window is displayed. Enter the general information for the assignment. Click on a field to see an explanation of what to enter.

Replacing the file information
To update the information in the web archive element, click on the name of the file from the Elements list, then click Upload from the task list. The Upload File window is displayed. Choose the file you want to use to update the web archive element, and click Upload.
You can manage additional details of the web archive by selecting the following from the task list that is displayed when you click on the Web Archive element name from the Elements list:
- Preview Web Archive - View the web archive as the student sees it. For more information, see Previewing an element or a course.
- Parameters - (NEED TO FILL THIS IN)
- Revisit - Specify if, and how long after completion, you want the student to be able to go back and review the web archive. For more information, see Revisiting an element.
- Availability - Specify when the web archive is available as part of the course.
- Visibility - Specify when the student is able to see this web archive as part of the course.
- Activate - Make this web archive an active part of the course. Only active course elements are visible to the student taking the course. For more information, see Activating an element.
- Copy this Element - Use this element as a template for another web archive. For more information, see Copying an element.
- Delete this Element - Delete the web archive. For more information, see Deleting an element.
- Notifications - Create a notification that the web archive is downloaded and available.